Friday, March 23, 2012

Herbal Antibiotics for Colds and Flus

You are probably aware (hopefully) that most colds and flus are not caused by bacteria, they are caused by viruses. Therefor, standard antibiotics are useless as a remedy for colds and flus. There are now anti-viral medications, but they are most effective if administered early on, and may have some side effects. Plus, who really wants to schlep into the ER when you feel lousy and your immune system is already compromised? Secondary infections are often more dangerous than the original virus.
It turns out that many common herbs are not only antibacterial but also antiviral, and have minimal to no side effects. In the book Herbal Antibioitics, Stephen Harrod Buhner presents his top choices for cold and flu fighting herbs, including echinacea, wormwood root, balsam root, boneset, red root, licorice, sage, garlic and honey. (While not technically an herb, honey is often used in herbal medicine and so is included in the book.) Complete dosing instructions and contraindications are given in the text. I highly recommend the book, as it gives not only practical information on herbal use, but an overview of the history of antibiotics and how antibiotic resistance spreads. Technically, he includes both herbs and spices in his arsenal, as various plant parts are used.
An example of the easy to use recipes that Stephen provides is The Best Cold and Flu Tea, which contains:

2 teaspoons sage
juice of one lemon (or one teaspoon lemon balm herb)
Pinch cayanne pepper
1 tablespoon (15 ml) honey
To prepare the tea, pour one cup boiling water over sage and allow to steep for 10 minutes. Strain out herbs, ad remaining ingredients, and drink hot.

Monday, January 23, 2012

Use rosemary leaves for glossy hair and good circulation


Rosemary (Rosemarinus officinalis) is a wonderful smelling, multi-purpose herb; the leaves of which have been used in traditional cures for centuries. The herb stimulates hair growth and makes hair smell delightful. Rosemary is said to enhance the memory by improving blood circulation.

Rosemary for hair

Rosemary tea can be used as a conditioning hair rinse. The herb will help to combat dandruff, and rosemary vinegar applied to the hair will make hair gloriously glossy (especially dark hair). Combined with horsetail, rosemary is said to aid hair loss recovery in cases where hair loss has been due to stress and worry.

Rosemary tea recipe for hair: Pour a cup of boiling water over two to three teaspoons of fresh or dried rosemary leaves, cover and allow to steep for 10 minutes or so. Drink two cups of rosemary tea a day to prevent hair loss through poor circulation and to stimulate growth after an event such as chemotherapy.

Rosemary vinegar recipe: Take 25g rosemary (fresh) and add to 1 liter of cider vinegar. Allow to steep in the vinegar for two weeks then strain, bottle in a glass bottle, date and label. Use 2 dessert spoons in final rinsing water after washing hair. To fight dandruff, massage the rosemary vinegar into the scalp 20 minutes before washing.

More uses

For poor circulation, take rosemary regularly. It is a useful addition for conditions associated with cold and poor circulation. Use as an infused oil for massage of cold limbs, aches and pains.

Rosemary has a reputation for improving memory - researches have found that rosemary contains carnosic acid, which can fight off free radical damage to the brain. In addition to improving memory, it would seem that rosemary can protect the brain from strokes and conditions such as Alzheimer's Disease.

One of the properties of rosemary is to lift the spirits and it is useful in cases of depression. Add 15 drops rosemary oil to a warm bath to ease muscular tension, improve circulation and boost the spirits.

The herb is useful in cases of poor digestion, gall bladder inflammation and general feelings of being liverish.

Rosemary is useful as a gargle for sore throats.

Rosemary oil blends well with oils such as frankincense, basil, thyme, bergamot, lavender, cedarwood, cypress and spice oils such as cinnamon, clove, ginger and black pepper.

Caution: Avoid in large doses during pregnancy. Rosemary is not suitable for people with epilepsy or high blood pressure.

Sources:

http://www.naturalnews.com/028303_h...


Learn more: http://www.naturalnews.com/032781_rosemary_hair.html#ixzz1kKCHV0zm

Friday, March 25, 2011

Soap making Class: SELL ON BLOGGER ???

Soap making Class: SELL ON BLOGGER ???: "Sell on Blogger??? I just discovered this from Google Labs. You can create an online store on your blog. Who knew? All you need to do ..."

SELL ON BLOGGER ???

Sell on Blogger???


I just discovered this from Google Labs. You can create an online store on your blog. Who knew? All you need to do is sign up for Google Checkout, add your products to a Google spreadsheet and create your widget.


Pretty neat! Check it out...

https://storegadgetwizard.appspot.com/storegadgetwizard/index.html

Thursday, March 24, 2011

iDIY Jr: welcome

iDIY Jr: welcome: "Welcome to 'i do' it yourselfs new blog iDIY Jr! Due to the overwhelming success of our printable wedding stationery 'i do' it yourself is n..."

Wednesday, March 9, 2011

Soap making Class: Do It Yourself Project: Sweet Treat Favor Tin

Soap making Class: Do It Yourself Project: Sweet Treat Favor Tin: "I love this project, and I’m super excited to share it with you. If you’re interested in giving your guests options to satisfy their sweet t..."

Do It Yourself Project: Sweet Treat Favor Tin

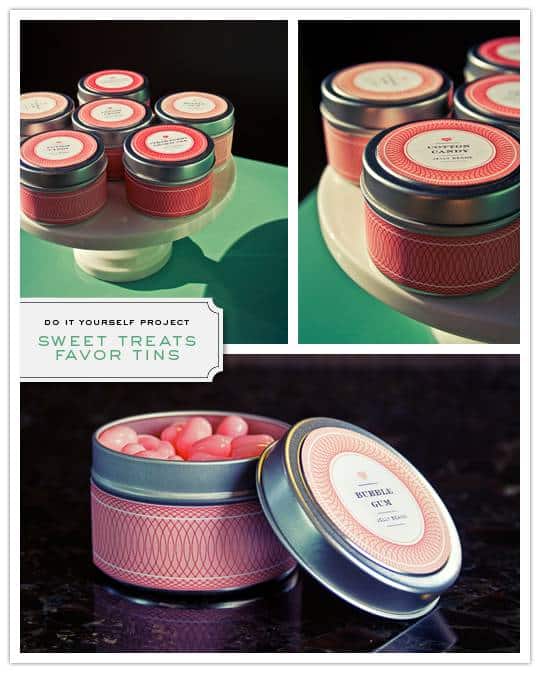
I love this project, and I’m super excited to share it with you. If you’re interested in giving your guests options to satisfy their sweet tooth, but don’t want to have to coordinate a candy buffet, use this as a great way to get an assortment of the same candy and identify them accordingly. In this example, I have three flavors of pink Jelly Belly jelly beans, and have used the template to make three shades of the same color to help identify which flavor is which.
As a note before we begin, it is super important that you ensure that your metal tin is food safe when you make these. Unless you plan on using these to hold something else that your guests will not be putting in their mouths, you need to check with your supplier that the container you choose is food safe certified. If it is, it will most likely say so on the product page on the suppliers’ website, but if you have questions, you should contact the company to make sure.
DIY Sweet Treats Candy Tin Favors
What You Will Need:
4-ounce Food Safe Metal Tins (should be approximately 2.5″ in diameter like these from SKS Bottle)
Our Tin Cover Label PDF (available herehttp://www.inspiredbride.net/2009/08/17/do-it-yourself-project-sweet-treat-favor-tin/)
Our Tin Base Wrap PDF (available here)
Good Quality Printer Paper
Double Stick Tape
Scissors
Rotary Trimmer and / or 2.25″ Circle Punch (optional)
Assorted Candies of Your Choice
STEP ONE: Open both PDFs in a program that will allow you to edit it – I recommend either Illustrator or Photoshop. Add whatever text you would like to the cover label to customize it to your liking (the typefaces I used are Engravers LH Boldface and Sackers Gothic Medium). If you want to shift the color of the labels in Illustrator, click on the individual elements separately (the hairline stroke detail and the clipping mask background) and change the swatch manually – note that both are actually the same color, but the design element is set to display with the Multiply effect. If you have imported the PDF into Photoshop, you can adjust the color through the Image » Adjustments » Hue/Saturation tool and move the sliders to your liking.
STEP TWO: After prepping your files, print them. Trim each label and wrap as precisely as you can – a rotary trimmer is a great tool to have on the wraps. If you’re worried about cutting the circles out, I’ve seen 2.25″ circle punches available in craft shops – I’m sure there are quite a few places that sell them online, too.
STEP THREE: Before applying any of your labels to your tins, clean each of them thoroughly. If you have pets in the house, assemble your favors in an area that you can block off while putting them together so no pet hair makes its way in. It seems obvious, but you know – it’s got to be said. Particularly since my kitties like jelly beans. And cupcake icing. And chocolate chips. (They inherited their mommy’s sweet tooth.)
STEP FOUR: Turn the cover label over and apply double stick tape to the back side. I found that the finished piece looked best when I avoided letting pieces overlap but still covered it thoroughly – particularly at the edges. After applying the tape, turn the label over and center it visually within the surface of the tin cover. Press firmly down to secure the label in place.
STEP FIVE: Turn the wrap label over and apply double stick tape to the back side. After applying the tape, turn the wrap label over and vertically center the left edge of the label on the base of the tin. Continue to wrap the label around the base of the tin, keeping it as straight as possible, until both ends meet. In most cases, the label will have a little overage – you can overlap the ends or trim the extra depending on your preference. Press firmly down on the wrap to secure in place.
STEP SIX: Fill each tin with the candy of your choice. For the record, my four ounce tins did hold almost exactly four ounces of Jelly Belly jelly beans, though that could change depending on the candy you use if you pick something different.
That’s it! You’re done. It’s that easy – even your not-so-crafty buddies will be able to manage this, so call everyone up, rent a movie, and get that production line going!